Tag: Shoot plan

  • Blog: Employing Symmetry (Part 2)

    Blog: Employing Symmetry (Part 2)

    In part 1, we introduced the idea of engaging with symmetry. The reason for this guide? In the same way that we tend to love patterns, symmetry is like Nutella for our eyes. And if you don’t like Nutella, what’s wrong with you? Seriously… Nutella is great. And peanut butter. Yum. Nutella AND and peanut butter. Om nom nom.

    Anyhoo, I digress.

    Why do we like symmetry so much? No one actually knows. There have been studies that reveal that babies will stare longer at symmetrical pictures than they will at asymmetrical ones. And scientific evidence also suggests that as a species we’re more attracted to symmetrical faces. In short, there is something extremely appealing about symmetry, and we’re drawn to it. So, then, we need to have a really, really good reason to intentionally mess with this particular guide.

    As with most of the visual rules we employ – that is the key. Once we understand how and why it works – and just as importantly, we can make it work ourselves – we can then consider messing with it. Take for example Stanley Kubrick, as he is a great case study for a/symmetrical cinematography:

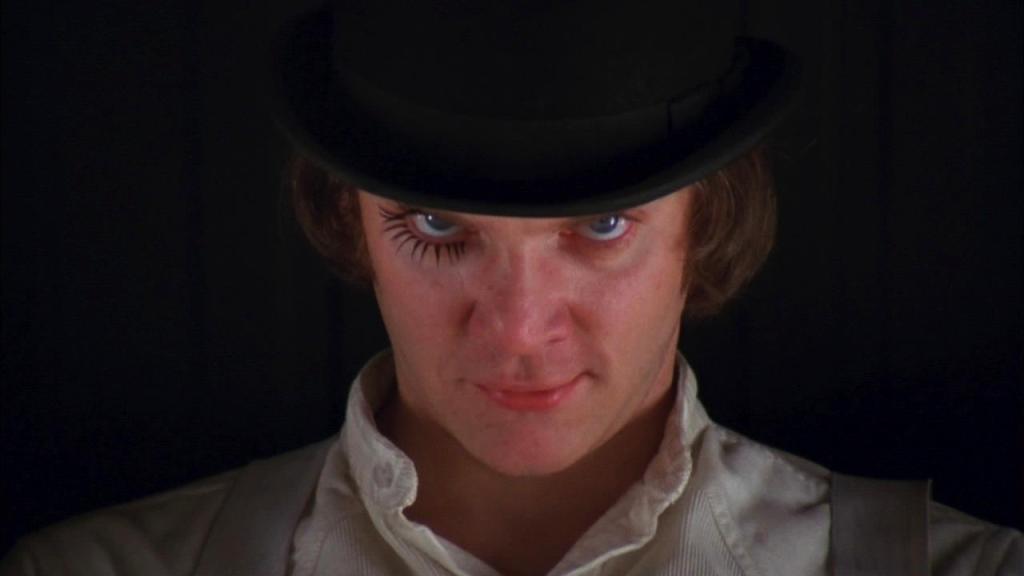
    In cinema what isn’t shown is almost as important as what is. Take the masterful direction of A Clockwork Orange’s opening scene for example.

    Kubrik could have started with a wide shot of the Korova Milk Bar. Instead, he begins with a 16-second straight-on tight shot of Alex’s (the protagonist) face in centre frame. Why? In an instant, he highlights a contrast between symmetry and asymmetry to describe Alex’s madness and deviant behaviour.

    Without uttering a word, the viewer immediately perceives the symmetry. But as the 16-seconds lingers, a visual disquiet makes itself known. In addition to being stared at, there was an alteration to the natural balance: Alex has placed black eyelashes on his right eye only. It is only a tiny detail – and yet it is enough for most viewers to be disturbed by this variation, hinting to them that Alex is not normal. This is then emphasised as the long take begins it’s zoom out.

    Let me say this – and I really can’t stress this enough – there should be no rules when it comes to cinema. Techniques such as symmetrical framing (amongst all the rest) will almost ensure that your image will be aesthetically pleasing. But we do run the risk of creating images that are predictable, common, and quite frankly, boring. Nevertheless – we need to know them, know why they work, know how they work, and know why our piece needs to throw that guide right out the window. Even if it’s by using something as simple as eyelashes.

    Do you have your own thoughts and symmetrical suggestions? Leave a comment below. And if you would like to check out another blog post looking at symmetry, the you can gorge yourself right here.

  • Blog: Employing Symmetry (Part 1)

    If you have ever done research on how to get the right visual shot – whether painted, photographed, or captured in motion – then you probably know the ‘rules.’ This stuff isn’t new. But today I think it’s worth repeating.

    The elephant in the room is that, to misquote the rogue pirate Barbossa, “… the code is more what you’d call “guidelines” than actual rules.” While there is aesthetic appeal with a host of the visual rules that have developed over centuries – the fact is that we can quite easily go ahead and break them. But. Before we do… we really ought to know why the guidelines exist, and why they work first. Then we can decide when and how to best ignore them for our work.

    To demonstrate, take a look at this montage of the cinematographic symmetry (try saying that three times fast!) used in the internationally acclaimed TV series, Sherlock.

    There is something kind of soothing about it, isn’t there? To put it as simply as I can, where the goal of composition is to create a path that is pleasing for the eyes to follow (this is why the guideline exists) – symmetry gives the viewer a vague sense of the harmonious, of beautiful proportions, and of balance (this is why this particular guideline works).

    There are many techniques that will strengthen (or weaken) the symmetric properties of an object or scene. How much of a scene we choose to show is paramount. So too is the position of the camera in relation to the subject, its height, tilt etc. We also need to take particular care to ensure the centre of the composition is equidistant (my word of the day!) to both sides. When done right, it looks simply beautiful. But can you imagine – for example – a shot of the Taj Mahal (an entirely symmetrical structure… right down to its symmetrical reflection in the pools of water around it) that has been misaligned? Well… it would look sort of like this…

    The fact that this image is only slightly out is enough to make it a jarring visual. So while it is possible to break the guidelines of symmetry, if and when we chose to do so, we will really need to go all out. No half measures.

    Coming up in part 2, we will finish looking at how to employ symmetry with another example or two, and some concluding considerations.

  • Video Montage: The Turn Smile (Dissolve)

    If you were to ask just about any serious cinematographer for their thoughts on stock footage, the general consensus would be one of derision. In a digital age where content creation is often more important than the complaints of said cinematographers though, using stock footage is a tool you might want to seriously consider. That advice is not without a warning label though.

    Back in April the team at No Film School gave us 6 awesome reasons to consider using stock footage in our work: the cliff notes version is that,

    1. It’s often cheaper and easier than shooting something yourself,
    2. Hollywood uses it,
    3. It’s ready when you need it,
    4. Not all stock footage looks like “stock footage”,
    5. You don’t have to travel everywhere or pay for permits, and
    6. Guess what — stock filmmakers are filmmakers too.

    If you have never heard of Dissolve – it is a stock footage provider, though their branding works quite hard at differentiating itself as a provider of better quality stock than you might get elsewhere. By and large, I like their stuff. With that being said, their own array of stock collages (of which today’s clip is just one example) prove an important point… too much of a good thing really can be terrible! For me, it also highlights this fact: some stock footage really does just look like stock footage – even when you have a better quality stock product!

    Some stock – like the turn smile – just has that look about it. And you know what? That is okay. My point is that if we can stay somewhere between the extremes of outright stock derision and attempting to create a piece using only stock, we might be surprised at how handy – and effective – some well placed stock footage can be.

  • Video Montage: The Breaking Bad Wide Shot (Luengo Ruiz)

    One of the things that I enjoy about film and television is seeing how different directors and DP’s style their work. Even if we have never consciously considered the styling used – once it has been pointed out, we will generally have an “oh yeah!” moment. This phenomena is precisely why I enjoy the following clip by Spanish editor Jorge Luengo Ruiz.

    Inspired by an interview with DP Michael Slovis of AMC’s Breaking Bad fame, Luengo Ruiz highlights a key stylistic shot used throughout the show by montaging them all together into a short 4-minute piece. Care to guess what it is before clicking play?

  • Video Montage: Keeping The Distance (Between the Frames)

    Last time I shared a video essay and an article that opened up on the whole idea of framing beyond the rule of thirds. Well today I want to continue in that vein with this great little piece by the Between the Frames channel over at Vimeo. As written in the description, “This video explores how director Bennett Miller consistently uses wide shots throughout Foxcatcher to highlight the physical and emotional distance between characters, their situations and how we, the audience relate to them.”

    Honestly, the montage of all of these elements might leave you feeling a little cold: but it is well worth watching and seeing how much an effect celever framing can have.

  • Article/Video Essay: Beyond the Rule of Thirds/The Quadrant

    Whether you started out in photography, or you were dumped into the deep end of video and film – you will know of the rule of thirds (RoT). It’s one of those unstoppable forces that influence every aspect of both!

    Like many “rules” in avenues of artistic endeavour, the RoT is an excellent starting point – particularly if you haven’t yet developed an instinct for good visual composition. Once you know the why and how behind effectively utilising the RoT, however, you ought to expand your visual vocabulary – developing visuals that aren’t necessarily tied down to the RoT (I can’t help but think of Barbossa here: “the code is more what you’d call “guidelines” than actual rules.”).

    So if you are willing to wade out into the deeper waters of visual framing and composition, then this article by Doddle offers a great variety of framing illustrations that go beyond the rule of thirds: the golden spiral, quadrants, diagonals, the centre, as well as playing around with the edges and intentionally unbalancing the frame.

    If you happen to want a more in-depth video essay to help you shake your RoT shackles, then look no further than this great example by the Every Frame of Painting YouTube channel – it breaks down the quadrant system of framing that was used in the 2011 film Drive. Enjoy!

  • How To: Slate Like a Pro

    Continuing my series of resource links, today I want to share an excellent how to by the Rocket Jump Film School team.

    That moment when your first slate arrives can be pretty exciting. Suddenly you feel a little more professional, you know (well I did). But I had no idea whether there were some common practices when it came to slating. And if you were like me, then those first takes seemed more like an excuse to clap our slates at random intervals rather than being of practical use for the shoot.

    Thank goodness they are more than just a fun item to keep on set for the amusement of the crew though. And in this how to, RJFS break down some simple pointers to help you slate a little bit more like a pro. Enjoy!

  • Concept Video: Moments (Haraldsson)

    Continuing my series of resource links, today I want to share a fun concept clip that was commissioned by the Icelandic telecommunications company Síminn a couple of years ago.

    If you have done any manner of research into equipment for video and film shoots, then you will know that there is an abundance of recommendations: you need to get this camera, or that type of lens, or this kind of bundled kit. And, of course, each one of those recommendation is the must have. Here is a little something that I have learnt: they are only a recommendation. In fact, unless you have specifically given the unique and particular needs of your shoot and have asked for specific assistance, it will not be an equipment gospel that you need to stick with (I know, I can hear the collective gasp of every blogging videographer from here… relax everyone, I’m not preaching heresy – just let me make my point before you stone me).

    What we need to do is to take those recommendations, and then assess whether the suggestions offered meets the needs of our shoot. It is all about knowing which tools will actually best suit the job you are working on. That is the basis for today’s post (collective sigh of relief from videographer blogosphere).

    So lets come back to the video: created by Harald Haraldsson, this concept clip (and I am including the BTS for your pleasure too) was shot entirely on a Samsung Galaxy S3. You read that correctly. And S3. While there is an incredible array of (technically, and visually) better recommendations for a professional video shoot – the tool that happened to be necessary for this particular job ended up being the comparatively simple smartphone.

    It is easy to get overwhelmed with the latest and greatest options. So take some time to consider what your shooting needs will be, and then go about finding out what equipment will best help your realise that visual dream. Sure, it might be something really nice like an Arri or a Red. But you know what – all it may take is a humble smartphone (or a DSLR, or a GoPro, or a BMDPCC) to actually get the job done.

  • Video Article: Understanding Jump Cuts

    Continuing my series of resource links, today I want to share a video I stumbled on a little while ago. Coming from Vimeo’s Riley Hooper, it offers a pretty concise explanation of the technique known as a jump cut. Even if you have never heard the term before, I can guarantee that you all know what a jump cut looks like… though picking up pace in more and more places, it is a ubiquitous transition amongst the most popular of YouTube’s vloggers. As someone cleverly observed, “Anything other than a jump cut would create a slower experience that would leave you less stimulated and thus more likely to click away.”1

    So, jump right in. 🙂

  • I Shot the Deputy

    To this day my Dad loves listening to songs from his generation on the radio. And while I have come to appreciate some of the old classics: it still drives me up the wall that I am not able to listen to more modern music if Dad is around! Hence the title of today’s blog: in moving along with the importance of planning, it seemed funny to me that the first thing that came to mind when considering the title for today’s post was Bob Marley’s I Shot the Sheriff.

    Moving on, let’s get into the point of the post: planning our shots. Some might find this line of thinking a bit simple. In a number of ways, I’ve personally come to love the KISS principle when it comes to video making. Why should we make things more difficult than they need to be? Now don’t get me wrong: if you want in depth, I can absolutely appreciate that – and can even do that – it’s just that this blog isn’t where that’s going to happen. Maybe I’ll write a book one day. 🙂

    Now, in the last post we looked at the importance of establishing our shoot plan: do you recall this Videomaker quote: “When you plan like a pro, you: Plan the shoot in pre-production, shoot the plan in production, and edit the planned shoot in post-production.”? Once we have a plan for our shoot, we’re ready to begin planning individual shots. And though it may seem obvious, it needs to be said that we ought to have a reason for every shot. How may we start that process? By asking ourselves a couple of simple questions, such as:

    • What are we trying to achieve with this shot?
    • Is this necessary?
    • Is there already a shot that’s essentially the same?
    • Is our audience going to connect with the intention of this shot?

    “In any of the arts, the first step toward excellence is mastering technique – learning to use a specific technology skilfully and effectively.” (O’Brien & Sibley, 1995) When you, the videographer, use a camera creatively, planning your shots well – it changes from a simple, mechanical tool into an artist’s tool. Instead of making a random collection of seemingly unrelated images, it begins to communicate a story (if done well).

    There is an excellent exposition of the opening sequence of the original The Terminator film that I would like to reference here for a few minutes.

    Terminator Opening Sequence

    Image Source: http://cinevenger.com/wp-content/uploads/2012/03/vlcsnap-2012-03-15-20h59m01s15.png. Used under ‘Fair use’ (Copyright Act of 1976, 17 U.S.C. § 107)

    In the opening series of shots we are drawn into a futuristic, cyborg-dominated world without a word being spoken. That is the shoot plan. But how did they achieve that? Both James Cameron, as director, and Adam Greenberg, as director of photography, would have spent a great deal of time setting up the necessary sequence of shots needed to achieve that end. Like the first question above asks, they would have discussed what they were trying to achieve with each shot. And as you will see in this sequence – they chose to use low angled shots almost exclusively. In planning their shots, the audience immediately gets drawn into the narrative through a brilliant combination of visual (and audio) cues. If you want the full breakdown, check out the link to the exposition.

    For our purposes today, what can we practically take away from this example?

    Firstly, I would suggest that you take the time to get each shot right, especially if it’s an important one. You don’t want a low angled shot if you’re trying to visually communicate equality or submission.

    Secondly, if you are just starting out in videography, ensure that you leave at least 5 seconds of footage at the beginning and end of every single shot as a safety buffer. Professionals already know this one, as there is a sequence of calls used for each shot (lock it down, speed, and action).

    Thirdly, as a rule, concentrate on quality rather than quantity. Well-planned shot selection will eliminate overall resource waste. Too much material not only wastes time (and battery power), but it will make the eventual editing a much harder job. Be ready to get a few different versions of the shot – but only if it’s absolutely necessary. As much as possible, plan your shots first so you don’t need to work on an alternative.

    When you plan beyond the viewfinder you’ll find that you’ll save yourself time in the long run. Thorough production planning allows us to foresee problems that may arise during production, gather the required equipment for both the shoot and the individual shots, and to plan as many of the details as we can ahead of time. Sure – you will get the opportunity to cut stuff out later. But riddle me this: if you know that you’re going to do that, then why shoot it in the first place?